How to Generate Your Encryption Keys
Learn How to Generate and Manage Your Own Encryption Keys

Introduction
“Arguing that you don’t care about the right to privacy because you have nothing to hide is no different from saying you don’t care about free speech because you have nothing to say.” – Edward Snowden
Almost everyday we hear about data breaches, enterprise and government hacks, NSA backdoors in major proprietary operating systems, malware, spyware and ransomware. Its also common nowadays to know someone that had his email hijacked , or his intimate family vacation photos exposed to the wide public. If you’re not one of those people, you are extremely lucky, and if you are, you should seriously ask yourself why?! Either way you must reconsider your privacy and security choices, and learn a little bit of encryption basics and terminology that will keep you safe and anonymous in todays Internet wild wild west.
Creating and maintaining your own encryption keys is a must-know skill for anyone who’s serious about their security and privacy. If you have sensitive files on your harddrive, or surf the Internet on a daily basis then its a no brainer. You don’t have to know the intricate math details of how RSA or Elliptical Curve algorithms work, but at least you should be familiar with how good and effective they are against potential attackers.
GNU Privacy Guard
“GnuPG is a complete and free implementation of the OpenPGP standard as defined by RFC4880 (also known as PGP). GnuPG allows you to encrypt and sign your data and communications; it features a versatile key management system, along with access modules for all kinds of public key directories. GnuPG, also known as GPG, is a command line tool with features for easy integration with other applications. A wealth of frontend applications and libraries are available. GnuPG also provides support for S/MIME and Secure Shell (ssh).” – GnuPG Homepage
GnuPG is an excellent command line program that allows you to manage your encryption keys. It is a comprehensive tool that enable you to create all sorts of encryption keys using different military-grade algorithms. The keys you generate with GnuPG can have different capabilities (Ceritify, Sign, Authenticate, Encrypt). Keys can have multiple capabilities; however, the best practice is to create one key for each capability. Each key and/or subkey is a pair of public and private certificates. For example, an Encrypt capable key has a public and private certificates, together they constitute the encryption key.
Key Capabilities
Each capability defines what a key can do.
The Certify key is usually the master key. It can create and certify other subkeys. The sole purpose of the certify key is to create other subkeys. You DO NOT use it to sign, authenticate or encrypt files and/or communications. If this key gets compromised, your entire keychain gets compromised. This key is usually long-lived, some where between 3 to 7 years.
The Sign key is a subkey concerned only with signing files and messages. Just like your bank signature, a digital signature is a guarantee that the sender of the message is who he claims to be. You use the sign key to sign communications and files prior to sending them to recipients in order for them to verify that it was indeed you who sent the message and/or own the file. This is a 2 way process where senders and receivers have each others public sign keys and use them accordingly in each communication to make sure both parties are indeed the intended ones. This subkey is usually short-lived, ideally for 1 year.
The Authenticate key is a subkey to authenticate against well-known protocols; such as, SSH, Git, TLS, etc. For example, when you share your authenticate subkey public certificate with GitHub you will not need to authenticate with username and password every time you push or pull code. This key is usually short-lived, ideally for 1 year.
The Encrypt key is a subkey to encrypt/decrypt files and communications. Encryption is the process of changing a file’s original low-level representation of 0s and 1s into a different representation then sending it to the recipient. This way if an encrypted file or communication is hijacked by unwanted parties, they will never be able to read its content unless they have the required decryption private key. This key is usually short-lived, ideally for 1 year.
When sending/receiving files and communications with different recipients we only share with them our public keys and they share with us their public keys. This way if I want to send an encrypted file to Ahmed, I first have to ask Ahmed for their public key which I will use to encrypt the message. Then when the message reaches Ahmed he can then use his private key to decrypt and read the contents of that message. This is called Asymmetric Cryptography or Public-Key Cryptography.
What is ED25519?
ED25519 is a public-key cryptographic algorithm used for digital signature generation and verification. It is based on the elliptic curve cryptography and is considered more secure than other commonly used algorithms; such as, RSA and DSA. An ED25519 key pair consists of private key and a corresponding public key. The private key is used to generate digital signatures, while the public key is used to verify the signatures.
The ED25519 algorithm is based on the elliptic curve defined over the prime field \(2^{255}-19\). The private key is 256-bit integer, while the public key is a 32-byte sequence.
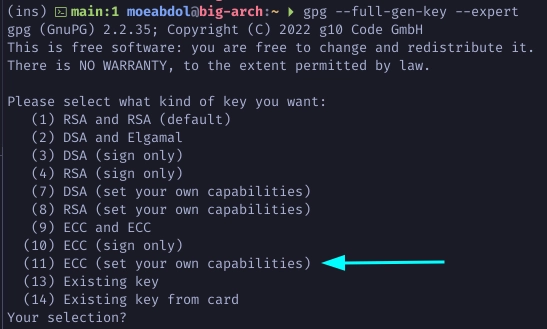
Generate a Master Key (Certify)
Run the gpg command with the following arguments. Choose option 11 to
create an ED25519 key to set your own capabilities for each key.
$ gpg --full-gen-key --expert
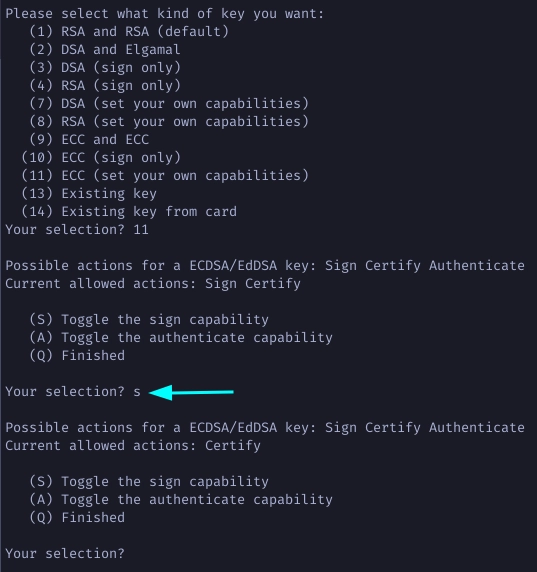
Toggle off the sign S and authenticate A capability to make sure the master
key is certify only.
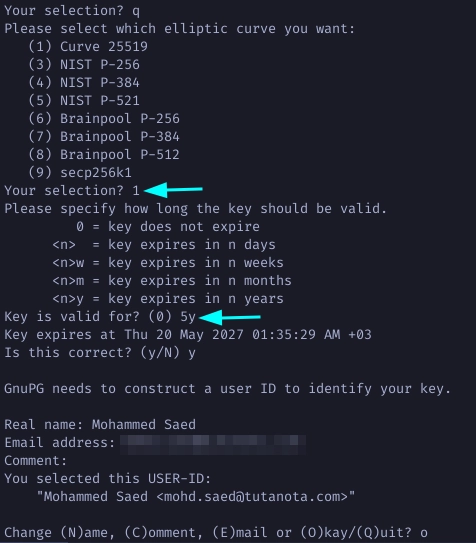
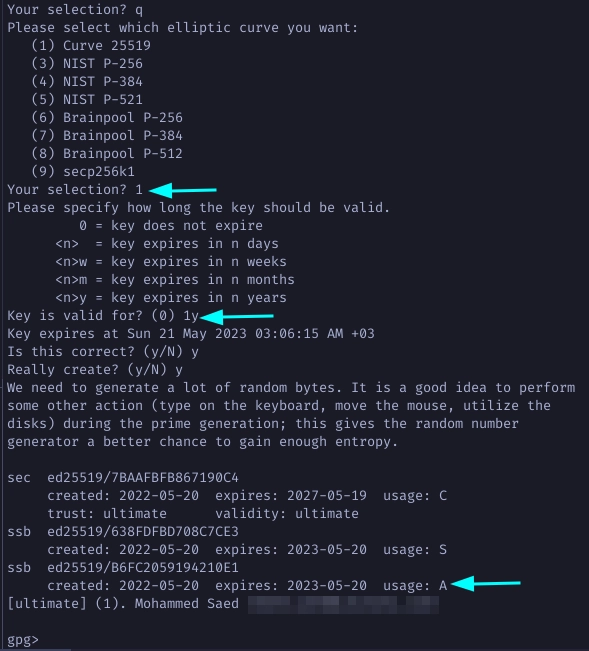
Choose Q to finalize the capabilities then choose 1 for Curve 25519 and set
the expiration of you master key. Enter your real name and password to set the
uid user identity to this key.
Choose O for Okay then type in a strong password to protect the key, and
voila your master key is created.
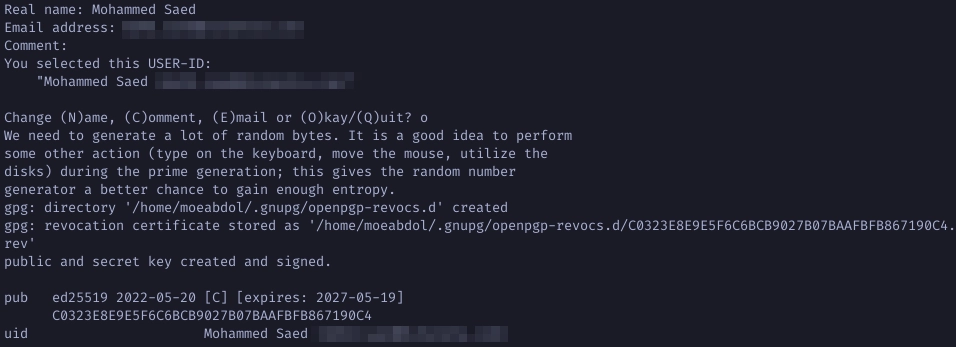
Note: Your master key has been created and using it now, you can create and certify subkeys. Contrary to older versions, gpg now automatically creates a revokation certificate for your keys.
Generate Subkeys (Sign, Authenticate, and Encryption)
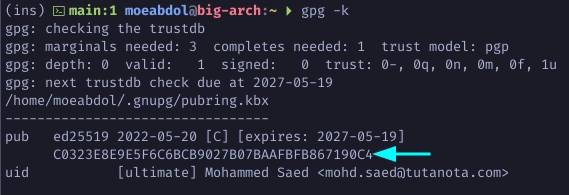
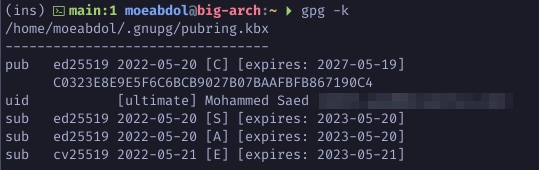
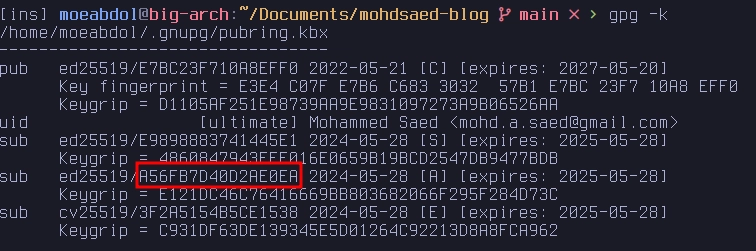
Run the following command to list your public keys. Copy your key id to be used in the next step.
$ gpg -k
Run the following to edit you master key and add subkeys. Type addkey to add a new subkey. Choose 11 to create an ED25519 subkey.
$ gpg --expert --edit-key <YOUR-MASTER-KEY-ID>
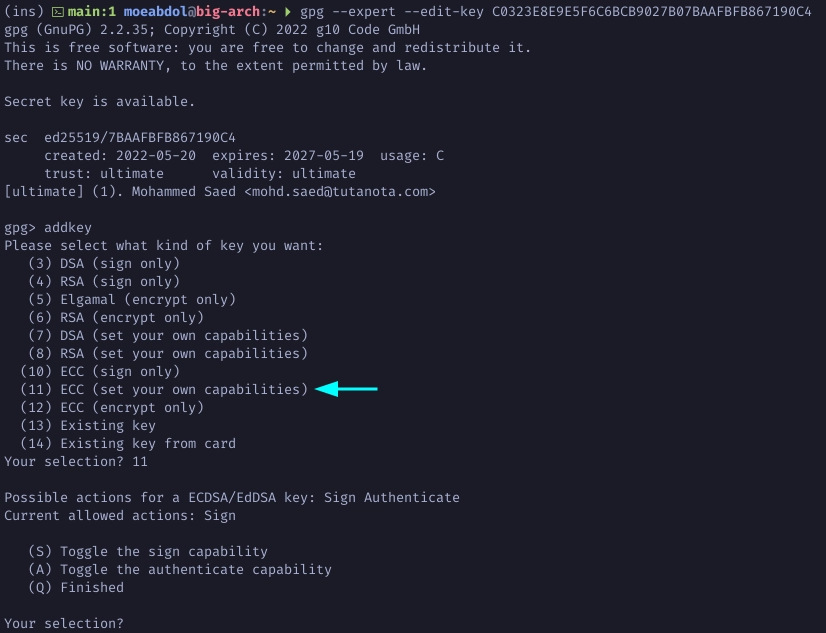
Make sure the Sign capability is on to create a sign subkey only. Choose 1 for ED25519 subkey and define the expiration.
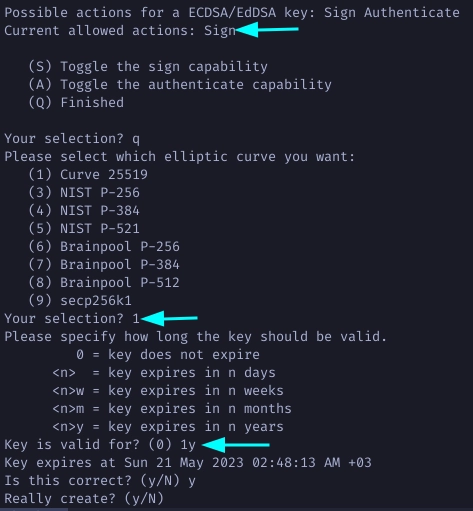
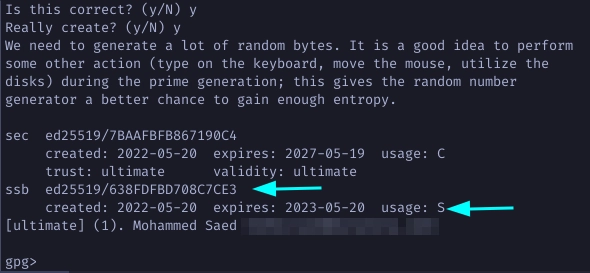
Note how the newly generated subkey is sign only.
Continue by creating another subkey with authenticate only capability.
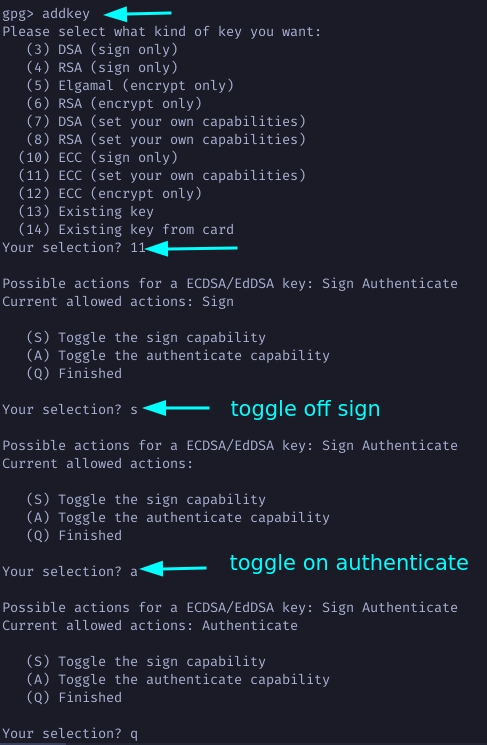
Again choose 1 for Curve 25519. Define an expiration period and note how your new subkey is authenticate only.
For the last subkey type addkey and this time choose 12 to create an
encryption only Curve 25519 subkey.
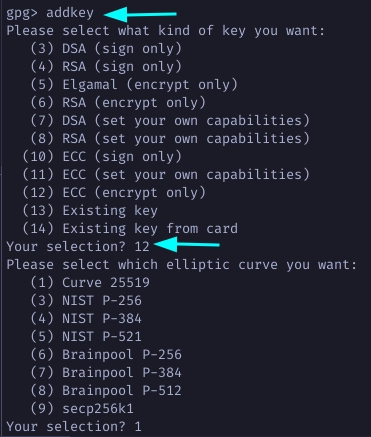
Define an expiration period and agree to the remaining questions.
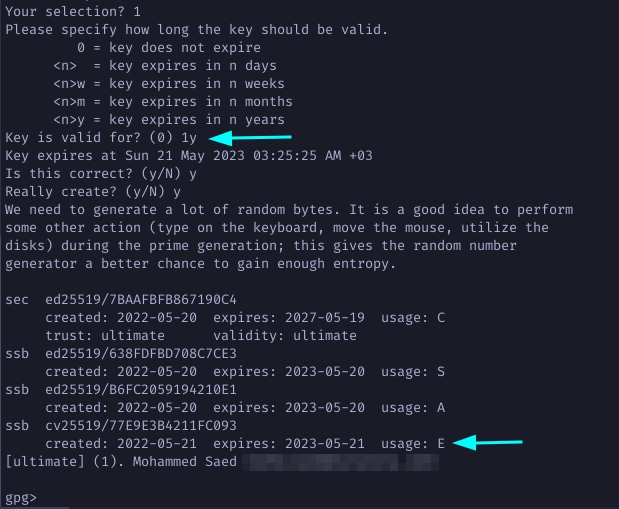
Finaly, type in save to save all your newly generated subkeys. Now list all
your keys.
$ gpg -k
Export Your Public Key
Export your public key to a file that you can share with others or use with Github, Gitlab, or other sites.
$ gpg --export --armor --output .gnupg/public_key.gpg <YOUR-MASTER-KEY-ID>
Now you can share your public key file with your friends, and they’ll be able to verify your signature against communications and files sent by you.
Export Your SSH Key
If you want to authenticate against Github and other services, you have to share
your Authenticate public SSH key. First list your keys and identify your
Authenticate key key id.
$ gpg -k
Run the following command to export your SSH key to screen.
$ gpg --export-ssh-key <AUTHENTICATE-KEY-ID>
Now you can copy your public SSH key and share it with Github and other SSH services.
Export Your Public Key to a Keyserver
In order to share your public key with others you can also publish your public key to a well-known keyserver. Create a gpg.conf file in your .gnupg and add a keyserver for example.
hkbs://keys.openpgp.org
Send your public key to the keyserver.
$ gpg --send-keys <YOUR-MASTER-KEY-ID>
Lastly, the keyserver will send a verification email to the email associated with the key. Verify your identity and now you can share your public key with others.
Backup Your Keys
Once you generate all your keys, go ahead and backup .gnupg directory to a
secure USB drive. When that is done you should delete your Master Key’s private
key and also the revokation certificate from your local copy of .gnupg in your
home directory. This is to ensure that no one can find your private key or use
your revokation certificate to revoke your key.
Run the following to list your private keys along with their keygrips.
$ gpg -K --with-keygrip
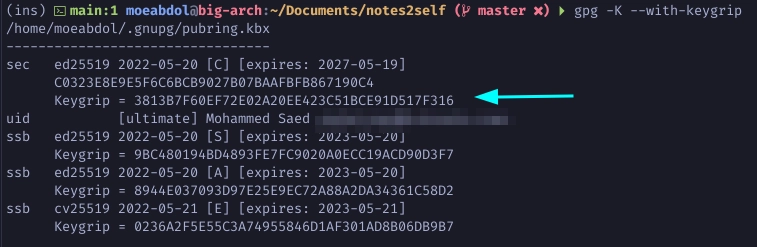
Delete the private key associated with you Master’s keygrip from .gnupg
directory in your home folder.
$ ls -al .gnupg/private-keys-v1.d/

$ rm -f .gnupg/private-keys-v1.d/<Master-Key-Keygrip>.key
Also delete the revokation certificate.
$ ls -al .gnupg/openpgp-revocs.d/

$ rm -f .gnupg/openpgp-revocs.d/<Master-Key-Keygrip>.rev
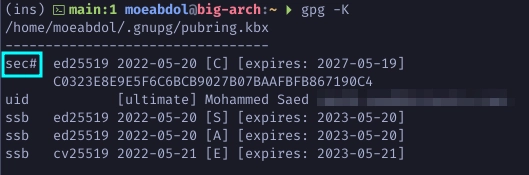
Note that when you delete your private key a sec# will appear next to your
private key to indicate that the private key doesn’t exist in your .gnupg
directory.
$ gpg -K
Finally, it is advised to change your passphrase to a shorter one for everyday use. This is to ensure that the original passphrase is never compromised.
$ gpg --edit-key <YOUR-MASTER-KEY-ID> passwd